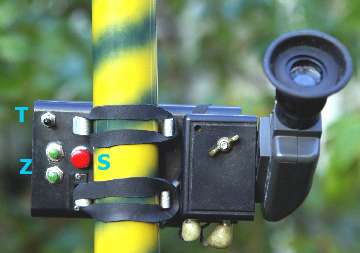
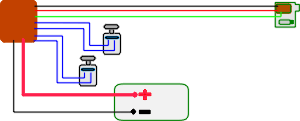
- With the pole control box 4 functions are commanded:
- - shutter release [S]
- - tilt [T]
- - video
- - zoom [Z]
The control box needs to be linked
to the dispatching box on the cradle. It could be done by
radio control. I have preferred a cable link. The control
box also supports the viewer and it contains the battery
to feed all.
The control box is set on the pole
itself such that the pole bearer can watch in the viewer.
|
-
|
-
|
-
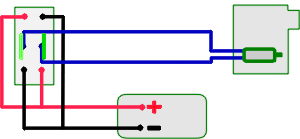
For shutter release of the Ricoh
GX100 the switch of the remote control device is connected
to the control box
|
-
|
- Shutter release
-
The shutter release depends on
the camera.. On most of my cameras it is triggered directly
on the camera, otherwise there is a module specific to the
camera.
A push button on the control box
is connected to the command on the cradle, whatever is the
camera.
This needs two wires. It is possible
to use the shield of the cable as one wire.
-
|
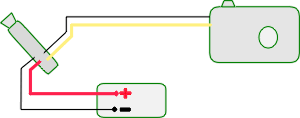
- Tilt
-
The tilt is a direct feeding to
the servo. There is a double toggle switch on-off-on which
power the servo with direct current, the polarity is inverted
by the toggle switch. The figure shows the switch as off
. When contact is done either way, the motor runs clockwise
or counterclockwise.
This needs only two wires.
|
-
|
-
|
-
|
-
|
- Video
The video output of the camera
is linked to the viewer. The viewer is recovered from an
out of order video camera. More details on this page: camcorder viewer.
This needs two wires. It is possible
to use the shield of the cable as the ground wire.
-
|
- Zoom
-
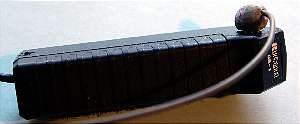
It is the most tricky to install.
On an old Vivitar digital camera I managed to control the
zoom with direct electric connections on the camera. However,
there was no step zoom. Now I have to get it done with a
servo-motor. For this, a servo controller is set in the
control box. There are two push button, one stepping up
and the other stepping down. See this page for more details
on the servo
of zoom. This needs three wires.
|
-
|
-
|
- Cable
-
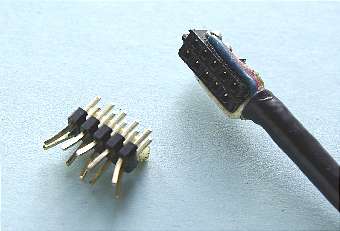
The cable connecting the control
box to the cradle is running through the pole. At the top
section, it must go through a 8mm diameter. It must also
have enough lines for all functions. It shall be as thin
and light as possible. On my previous cradles it is 4 wires
plus shield. Now with the zoom being added, it is
8 wires plus shied. This one is also heavier.
The trick is to have a connector
that can run through the Ø8mm pipe.
The only way have been to design
it myself with 2.54mm pin header. This is the cable connector
before it is coated with compound paste. Next is the male
plug
-
|
|
-
|
- Cable wiring
-
The connector of the cable on the
pole control box is a DIN 45329 (7-pin). This is because
I could not find a DIN 45326 (8-pin)
-
|
-
|
- 1 = shutter release
- 2 = ground shutter release and video
- 3 = video signal
- 4 = tilt
- 5 = tilt
- 6 = zoom code
- 7 = zoom plus
- 8 = zoom minus
|