POLE-HOLDER
-
- Inspired from holder for flags and combined with a belt-pocket,
this pole-holder is made of strong clothe.
-
- The pockett is rather rigid and the opening large enough
to easily set the pole in it.
-
- The clip est sized not to open when loaded..
-
- With this accessory, after a few minutes exercise, you
will ease to walk around with the vertical pole and to shot
pics.
-
-
|
|
 |
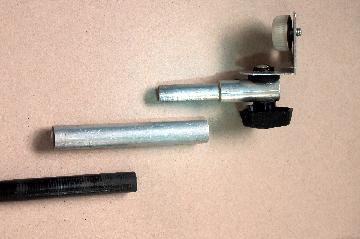
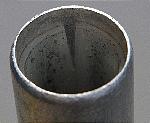
CO-AXIAL CONNECTING TUBE
This tube lets setting supports
and cradles on carbon or fiber poles or also on aluminum
temescopic poles.carbone ou en fibre de verre ou encore
sur des perches en aluminium.
It is an aluminum tube Ø
12 x 1 mm which length depends on the use needed.
.
|
-
|
-
-
- To fit on a conical section Ø 9 mm of a pole,
see the preparation on this page.
-
- To fit in a tube Ø ext 16mm, see the preparation
of setting in tube Ø 16 mm here below
-
|
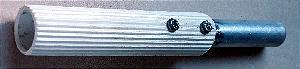
External fitting with internal
conical shape
The diameter of the tip of the
highest section of my rods is 9mm. It is the smaller usable
diameter for two reasons:
- The mechanical limit for
a 600g cradle is Ø 7mm
- Ø 8 mm is the internal
minimum diameter in which the connecting cable can go
through
As for the entire rod, the tip
is also conical. To avoid a connector which could damage
locally the rod, it must be conical and not cylindrical.
This is the fitting connector,
easy to set, easy to remove..
-
End of the tip before molding
the connector
|
|
Fabrication method:
¤ The connector is an aluminum
tube Ø12-10mm, length 150mm, which ends have been
smoothed.
¤ the end of the pole tip
is covered with several coats of very thin polyethylen film
on 15 cm long. The film in excess at the end is fold inside
the tube.
¤ 10 cm of the surface of
the film is coated with epoxy glue and also 5cm inside aluminum.
¤ This tube is slipped on
the tip over 10cm, end with 5cm glue first.
.
¤ let the glue become hard
Then dismount the tube and the tip.Remove all the polyethylene
film.
¤ Put again the tube on
the tip. It is now a perfect mechanical connector. When
strongly set, it doesn't turn.
|
Fitting in tube Ø 16
x 1 mm
This tube has an internal diameter Ø
14mm. Inside will be set a plastic sheet ~ over 1 mm thick,
which will be sticked. Rolled on almost one turn this sheet
will be given the shape as shown here which will let a variable
spacing along it. By adjusting that spacing, and depending on
the thickness of the sheet, the fitting will be stronger the
more the tube Ø 12 mm is set deeply. |
|
  |
ADAPTOR
TUBES
It is sometimes necessary to reduce the height of the pole
because of heavier equipment, too much wind, ceiling in a building,
etc or using a different pole.
From an aluminum tube prepared as shown above, it is possible
to make all kinds of tube adaptors for any rod diameter.
Opposite is an plastic adaotor tube for a rod Ø 18
mm. It has been thermically shaped to fit on a conical rod.
EUnde' is an aluminum tube Ø16 intermediate between
a rod section Ø13,8mm and the tube Ø 12 of a simple
support.
|
|
-
-
|
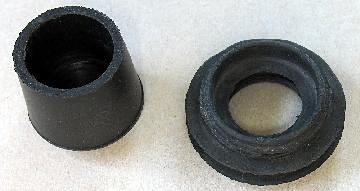
BOTTOM ENDS of TUBES
It is very necessary to protect the
bottom end of the poles especially the carbon ones. Replace
the thin rubber plug which usually easily slip away.
Opposite are examples of what I use.
The hollow one let the electric line to go through the pole
for control of the cradle and of the camera.
|
|
|
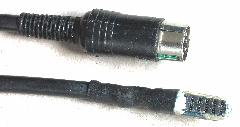
LINK COMMAND
<--> CAMERA
Several possibilities are offerred
to us:
- a wire link
- a radio link(with emitter-receiver)
- a wi-fi link(with some
cameras)
-
The
two wire connectors: DIN plug and special Ø 8 mm
plug
with
10 pins connexion.
|
|
-
- Until now my choice is a wire link.
- A cable with conductors has been unsufficient and a
cable with 8 conductors has been made to command a zoom.
-
- Its advantages:
- - less batteries
- - less setting problems
- - Research of failure is easier.
-
- Its disadvantages
- - installation of the cable
- - "excess" cable when operationg
with a shorter pole
-
-
|